ON THIS WIKI
Tutorial:Phosphor Processor (Forestry)

|
This article is part of the Feed The Beast Wiki's Tutorials section. |
This machine makes use of components from RedPower 2, Factorization, Thermal Expansion and Buildcraft 3.
| Supplies | |||||||
|---|---|---|---|---|---|---|---|
Solid Block |
Any Pipe |
Any Power |
Any Cable |
Any Chest |
Sand, Dirt or Cobble?
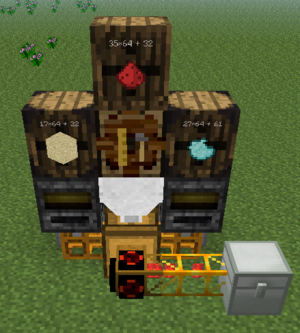
Any of these three materials can be combined with Phosphor to create Lava. Dirt and Cobblestone yield 1.6 buckets of Lava for one block + 2 phosphor, Sand yields 2 buckets of lava per one block + 2 phosphor. An infinite source of Cobblestone is the easiest to add, by placing an Igneous Extruder on top of the block material barrel.
Why A Hopper?
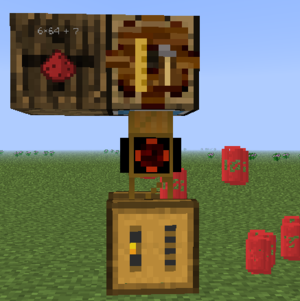
A hopper is used in this design because gates are not smart enough to look at specific slots of multi-inventory blocks like the Squeezer, and as a buffer against overflow. Hooking the Auto Workbench directly to the Squeezer with a Wooden Transport Pipe causes the Wax Capsules to overflow or run empty, because the Gate does not look at the single inventory slot for the capsules but the larger grid inventory for ingredients. There is also a delay between the Gate switching off and items being placed inside the Squeezer, as multiple capsules will be in transit inside the pipe and have nowhere to go.
The use of a Hopper gives the Gate a separate inventory it can look at to judge if more capsules are needed or not, which makes for a stable, more robust system.
Build
A space three blocks wide, four blocks tall (+3 blocks underground), and three blocks deep is needed. Allow extra space above the machine if automated delivery pipes are desired to refill the Barrels. Begin by placing the Squeezer in the middle of the space, leaving one block behind for wiring, and one block in front for the extraction pipe that will carry the Lava Capsules.
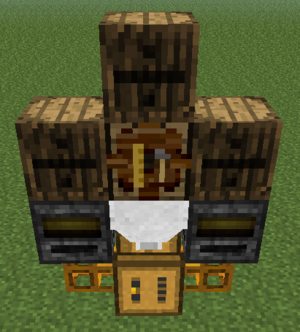
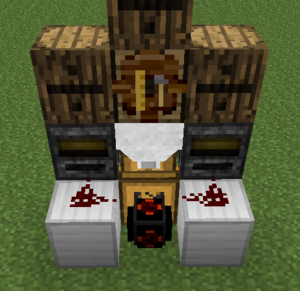
Attach one Pneumatic Tube to each side of the Squeezer, and a Hopper on top. Place one Filter on top of each Pheumatic Tube by standing above or jump-placing, ensuring that it is oriented as shown. Filters are direction specific and will only operate if correctly placed. A Screwdriver or Sonic Screwdriver can be used to rotate the Filter if available. Put the Auto Workbench on top of the Hopper, and a Barrel on top of the table and both filters.
Configure the Redstone Energy Cell to IGNORE Redstone in the small tab on the right of the interface. The default output of 50MJ/t is fine, the Squeezer will use far less.
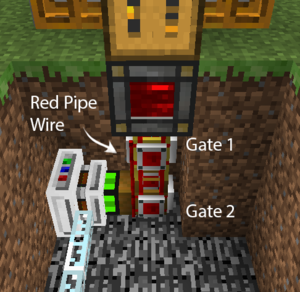
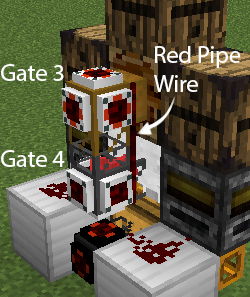
Put one Iron OR Gate on each conductive pipe. Iron OR Gates or higher tier are needed because normal Autarchic Gates cannot read Red Pipe Wire signals. Put one piece of Red Pipe Wire on each Conductive Pipe to connect them.
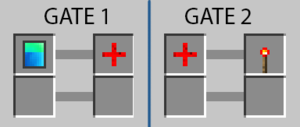
Set the top Gate (#1) attached to the Redstone Energy Cell to Can Store Energy / Red Pipe Signal. Set the bottom Gate (#2) to Red Pipe Signal / Redstone Signal. This means when the Redstone Energy Cell is not full, the top gate will turn on the red pipe wire. The bottom gate will detect this and emit a redstone signal, turning on the engine to begin recharging.
Set the Autarchic Gate (#3) to Red Pipe Signal / Energy Pulser. Set the gate below it (#4) to Inventory Empty / Red Pipe Signal. When the bottom Gate detects that the hopper is out of capsules, it will trigger the Autarchic gate to begin pulling capsules out of the Auto Workbench.
If supply and extraction are being automated, ensure that enough centrifuges are used to handle the output or overflow storage is available.
| |||||||||||||||||||||||||||||||||||||




 Discussion

