ON THIS WIKI
Tutorial:Getting Started (IndustrialCraft 2)

|
This article is part of the Feed The Beast Wiki's Tutorials section. |
This tutorial will be a simple tutorial on how to get established with IndustrialCraft2, and will advise you on what to do both with and without GregTech 4, as GregTech makes many recipes harder.
Contents
[hide]Prerequisites
I assume that you've already installed FTB/IndustrialCraft/GregTech, so we won't go into installation. I also assume that you know how to maintain a normal vanilla Minecraft survival world, because there are plenty of tutorials out there on those topics. Let's get started, shall we?
Getting Started
As you should know, IndustrialCraft adds many different machines and items to make Minecraft more interesting and help you along the way. It might seem quite confusing at first, but if you follow this tutorial carefully, you shouldn't have to ask anyone how to get started any more! First of all, just create a small base. You're going to want to do a bit of mining. You should find many ores, and depending on what other mods you have installed, you should find them at different levels. Here's a list of what resources you should gather, approximately how much of it, where to find them and what they look like:
- Copper - about 1 stack of ore (If you're playing on Ultimate, MindCrack or Direwolf20, by default it's found around levels 40 to 75. It is, however, more abundant around levels 45-50, and it is an orangey-browny-yellow. On most other packs, however, it can be found from around layer 10 to 70, and is more pale. Check out the Copper Ore page for more.)
- Tin - about 1 stack of ore (Again, if you're playing on Ultimate, MindCrack or Direwolf20, by default it's found around levels 25 to 50, and is light-blueish, with a bit of white. On most other packs, it is found from around Bedrock to level 40, and is white (There are many ores that are white, so don't get confused! After a while, you should be able to identify them). Check the Tin Ore page for more info.)
- Rubber - about 2 stacks, and a few saplings (If you are playing on the Ultimate Pack, there should be three types of Rubber Trees, all of which can be useful to you. The dark Rubber Tree with orange sapholes is the IndustrialCraft variety, and are common in Swamp biomes, but very rare anywhere else. They can also be found in clusters in the Twilight Forest. This Rubber Tree does not need to be cut down for the Rubber to be extracted, but rather a Treetap or an Electric Treetap can be utilized. See their respective pages for more information. The Orange Rubber Tree is slightly smaller and doesn't have saps. This has to be cut down for the Rubber to be harvested. It does give a different type of Rubber, though, but that doesn't matter, as all the recipes work with it just the same as the IndustrialCraft Rubber. The last Rubber Tree is from RedPower 2, and is a huge double-wide tree, found only in or near jungles. This is the hardest tree to extract rubber from. First the Wood has to be cut and it has to be put through an Extractor (which, by the way, we are going to talk about soon) to get the Rubber. All types, by the way, can be put through an Extractor to get more Rubber, but for the RedPower Tree, its wood has to be put into an Extractor for it to give any Rubber. Now, the first two trees don't give rubber when they are harvested with the said methods, but instead they give Sticky Resin and Rubber (MineFactory Reloaded) (this is not the finished product), respectively. To make them into actual Rubber and Rubber Bars, respectively, they have to be smelted in some sort of Furnace. If you are NOT using the Ultimate Pack, there are only two types of Rubber Tree (or on FTB Beta A, just one, the IndustrialCraft Rubber Tree), the IndustrialCraft Tree and the RedPower Tree.)
- Iron - about 3-4 stacks of ore
- Redstone - about 2 stacks of dust
- Flint - about 4 pieces
- Cobblestone - as much as you want, at least 32 pieces
- Wood - as much as you want, at least 16 logs
- Coal or Charcoal - about 32 pieces
Refined Iron and First Generator
You should save most of your ores, because in the future we'll make a machine that will double your ore output! So first things first, let's make some Refined Iron, which is basically an item that is used to craft many, and I mean many, IndustrialCraft 2 items. Just go ahead and craft a furnace, place it down and smelt about half a stack of your Iron Ore, and then smelt about 16 of your Iron Ingots. Now you have 16 Iron and 16 Refined Iron! While you're at it, smelt about half a stack of Copper and Tin as well; no more, to avoid wasting resources. "What do I do with this stuff?" you may ask. Well, we should make a Generator. It's useful to have one as it is a cheap 'machine' that will generate electricity, and will pump it out all of its sides. Just follow these steps:
|
Ingredients:
Produces: 1 x Iron Furnace* |
[Expand] 
|
|
Ingredients:
Produces: 6 x Insulated Copper Cable** |
[Expand] |
|
Ingredients:
Produces: 1 x RE-Battery*** |
[Expand]
|
|
Ingredients:
Produces: 1 x Generator |
[Expand]
|

*An Iron Furnace can act as a normal Furnace but is 20% faster and 25% more fuel efficient, so Coal can smelt 10 items in it instead of 8. **Copper Cable is used in quite a few recipes, and can also be placed to carry electricity. It is not recommended for long-distance wiring, as it loses energy quickly. Glass Fibre Cable is the way to go for that (although it is extremely expensive). Also, it can only handle 32EU/p (EU means Energy Unit and is IndustrialCraft Electricity, and p stands for Packet. Essentially, a Packet is a bunch of EU. For instance, take an Advanced Solar Panel. It can give out 32EU/t so each tick (20th of a second), it sends out a Packet. Copper Cable can stand 32EU/p, so it's alright. But if there are two Advanced Solar Panels giving out 32EU/t, the Copper Cable will still be fine, because the 64EU that it's carrying is separated into two separate Packets, each of 32EU.). ***The RE-Battery is used in many different recipes, and can be filled with electricity. The RE-Battery can also charge up any Electric items you might be holding/wearing, as long as it has power in it.
So you've successfully created a Generator and some leftover Copper Cable! Now what? Well, it's quite useless on its own, so we'll have to create a couple more blocks.
Electric Furnace
Go ahead and make another one of those Iron Furnaces and a few more Insulated Copper Cable, and then follow these crafting recipes:
|
Ingredients:
Produces: 1 x Electronic Circuit* |
[Expand] |
|
Ingredients:
Produces: 1 x Electric Furnace |
[Expand]
|
*The Electronic Circuit is another common Industrial component that you'll see around a lot of IndustrialCraft 2 recipes.
You probably guessed it! The Electric Furnace uses electricity, instead of Coal, Wood, etc., to burn items. Now we just have to place the Electric Furnace and the Generator. There are a couple setups that I will show you in this tutorial. I'm sure there are many others, but there are two common setups for IC2 Machines.
First Generator Setup

Pros: Tidy and easy to expand if needed. Also can see any storage device's progress from the front.
Cons: Visible wiring.
Second Generator Setup


Pros: Tidy and wiring not visible from front.
Cons: Harder to expand and cannot see how full a storage device is from front.
Setup Evaluation
So decide for yourself which setup you find most comfortable with, although I'm sure some of you can come up with more imaginative setups in the shapes of flowers, or one that combines both setups shown here. "But hang on," you inquire, "what do you mean by the second setup being harder to expand? It sure looks easy. Just dig the block behind where the machine's gonna be, slap a piece of wire down and place the machine. Right?" This is true, but that wasn't exactly what I was talking about. I'll explain the fundamentals here, but really you've got to understand more about IndustrialCraft electricity (unless you did electrical engineering somewhere, but that's not exactly the point). Different machines take in or give out different amounts of electricity. They are grouped into Micro (0-5EU), Low (32EU and downwards), Medium (128EU), High (512EU), Extreme (2048EU), Super Extreme (8192EU) and Ultra Extreme (1000000EU) Voltages. They can also store limited amounts of electricity. So machines are often installed to store electricity when it's not being used, and therefore save electricity. Sometimes 'machines' that store energy give out a higher voltage than the processing machines can accept. The Electric Furnace and its counterparts (we'll learn about them later) can only accept up to Low Voltage, and if they are given any more than that, they will explode! So, if we want to add a higher-tier storage device, we'll have to add Transformers, which will take the electricity they are given and step down the voltage. If there's anything you don't understand, perhaps read it twice more, but if you're really lost, don't worry, because we'll cover this again in the future.
BatBox
As I said a moment ago, there are EU Storage Blocks, and we're going to make one right now! Right now, we don't have much storage of EU. Our Generator only stores 4,000EU, and that's nowhere near enough. A BatBox can store up to 40,000EU, and that's good enough for now, though there are much better ones out there. BatBox stands for Battery Box, and here's how you make one:


|
Ingredients:
Produces: 1 x BatBox* |
[Expand] |
Now we'll just have to implement it into our Generator setup! An EU storage block always has five input sides and one output side. The output side would always face you when you place it. If you accidentally placed it facing the wrong direction, just right-click on the face you want the output side to be with an IndustrialCraft Wrench. And if you accidentally placed your BatBox in the wrong place altogether, it won't give you anything back if you use an axe! You must use a pickaxe (or a Wrench) for some strange reason. There's a picture for both setups to the right. Hopefully by now you've successfully installed your first BatBox! You can link a chain of BatBoxes, as long as the inputs and outputs are facing the right way. (See what I mean by harder to expand for the second setup yet? It's more convoluted.)
You can now use your Generator; just put a piece of (Char)Coal in the bottom slot, and see the numbers rise (and fall)! If your machines suddenly stop working, after using them, it's probably because you've run out of power or a creeper's gone and blown something up. Also, keep in mind that if you shift-click to get items out of an Electric Furnace, you won't get any XP, but if you just click on the item and put it in your inventory manually, you have a chance of getting experience. Also, making Refined Iron seems to give you XP every time, which is quite good! Again, if you shift-click the Refined Iron out of the output slot, you won't get the experience.
Macerator
Electric Furnaces are certainly not the only Electric machines you can get; there are tons more! Next we are going to make a Macerator.
NOTE: Here is where it changes for people who have GregTech installed! GregTech makes it a lot harder to make a Macerator - it requires three Diamonds, a bit of Lapis Lazuli and Glowstone. If you do have GregTech installed and haven't changed any settings, I suggest making a Pulverizer instead, but that will be in another tutorial. Check here, or here, when it gets written, for a more concise tutorial on the Pulverizer. The Pulverizer also has a chance of giving you a second output, though the Macerator is generally easier to maintain because it uses EU.
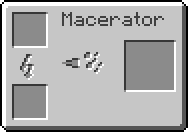
What does it do?
The Macerator can double your ore output, as promised earlier. If you put one Iron Ore in a Macerator, as long as it has power, it will give you two Iron Dust. Each Iron Dust can be put in a Furnace to create one Iron Ingot. This is the same for most ores, including, but certainly not limited to, Copper, Tin, Gold and Silver. The Macerator also has more uses than that - in can even grind Cobblestone into Sand. There are still a myriad more uses for the Macerator, so just play around on NEI a bit.
Recipe
Here is how you craft a Macerator (without GregTech, of course).
|
Ingredients:
Produces: 1 x Machine Block |
[Expand] |
|
Ingredients:
Produces: 1 x Macerator |
[Expand]
|
Now stick it in your Generator 'circuit', if you will, connect a bit of wire to it, and it's ready for use! Now you can put the Tin, Copper and Iron Ore that you found and put them in your Macerator(s). Then collect the dusts up and pop them in your Furnace(s). Make sure that if you're trying to remove your Macerator, don't use a pickaxe! It will return a Machine Block if you do so, and this is what we're going to talk about right now.
Wrench and Electric Wrench
Most IndustrialCraft machines will not return themselves when broken with a pickaxe. They'll normally return either a Machine Block, Generator or Advanced Machine Block, depending on what they are crafted with. A Wrench will have an 80% chance of giving you back the item. Still making you anxious? The Electric Wrench is available. If you're using GregTech, you'll need Steel, and that will be in another tutorial. If you are playing on the MindCrack pack or have added TrainCraft, here is a tutorial you can follow to make quick Steel. But if you're just planning to make a Wrench rather than an Electric one, follow the steps below:
|
Ingredients:
Produces: 4 x Bronze* |
[Expand] Shapeless
|
|
Ingredients:
Produces: 1 x Wrench |
[Expand]
|
|
Ingredients:
Produces: 1 x Electric Wrench |
[Expand]
|
*If GregTech is installed, crafting 3 Copper and 1 Tin together gives only 2 Bronze. This is because originally, IndustrialCraft 2 already had a recipe for Bronze Dust, which was 3 Copper Dust and 1 Tin Dust making 2 Bronze Dust (this recipe is still available, by the way), and smelting each dust gave one Bronze. However, a mod called Forestry added the Bronze Ingot Recipe, the one above, which stated that 3 Copper and 1 Tin made 4 Bronze. But GregTech wanted it to be true to the IndustrialCraft recipe, so it changed the recipe to 3 Copper + 1 Tin = 2 Bronze. I guess it's sort of like Mod Wars.
How to use the Wrench
If you placed down a BatBox the wrong way, right-click, with your newly-made Wrench, at the face you want the output side to be, and it should change. And if you placed down a Macerator at the complete wrong place, just right-click on it with your Wrench in hand, and hopefully it will return you the Macerator itself! Otherwise, unlucky. You lost a bit of flint, redstone, copper, iron, rubber and cobblestone. Boohoo. That's why you...
Always use an Electric Wrench!
Yes! It's not as easy to start using though. First of all, you have to charge it up with electricity. Just put it in your BatBox or in your Generator while it's running. Once the bar gets up to full, your Electric Wrench has completely charged! If you use it now, though, you'll still have a chance of losing the item. What you have to do now is set it on Lossless Mode. By default you hold down M and right-click, but M might conflict with controls from other mods (such as the map key). To change the key, go to the Menu (Esc), Options..., Controls..., find 'Mode Switch Key', and change it to a button that's not already used (such as N). To do that, click the button next to it (which should say M currently) and press the 'N' key on your keyboard, or whatever you decide to change it to. Now, go back to actual Minecraft, put your Electric Wrench in your hand, hold 'N' and right-click at the air. In the chat console a message should pop up, reading 'Lossless wrench mode enabled'. Now you're ready to remove machines! Take note that when you do, most of the time it will drain a lot of the energy from the Wrench. Put your Wrench back into your BatBox, as long as it has charge, and electrify it up again. You don't have to worry about losing your IC2 machines (and only your IC2 machines!) again!
Compressor
Now what? MOAR machines?! :D Who would have guessed? The Compressor is another iron-forged machine that has several recipes and is very useful for many intermediate items. Here's why:
Why a Compressor?
It's always useful to have every machine, and this is one of them. You're going to need it if you want to make powerful IndustrialCraft Armor like NanoSuit and QuantumSuit. You'll also need it to make Advanced Machine Blocks, the base of any Advanced IC2 Machine.
How to craft
The Compressor is a rather easy one to create:
|
Ingredients:
Produces: 1 x Compressor* |
[Expand] |
All you have to do now is stick it with your Generator, and it should be ready for use!
Solar Panels
I bet you GregTech users feel lonely at the moment, because I've left you out. To tell you the truth, I am a GregTech user too. But this tutorial is for IndustrialCraft 2 itself, not really GregTech, but I'll tell you a bit about what to do. In IC2, Solar Panels can be a very early-game thing, but with GregTech installed, they're an almost mid-game concept, really.
Solar Panels generate a little bit of EU during the day. They don't generate a whole lot, although they can be upgraded. They're quite a good thing to have if you want to sustain your EU without having to farm trees or having a Quarry and tearing apart the land, although IndustrialCraft offers even more generation of electricity, and we'll learn more about that in another tutorial or a lot later in this one.
Recipe
Without GregTech
For this you'll have to use your Macerator!
|
Ingredients:
Produces: 1 x Coal Dust |
 |
|
Ingredients:
Produces: 1 x Solar Panel |
[Expand] |
With GregTech
This is essentially how you make Solar Panels with GregTech (I won't go into as much detail as how to craft things; the recipes are on their respective pages):
- Make an Industrial Electrolyzer (or an Industrial Centrifuge, though the former is more useful), and put it with your other machines.
- In your Industrial Electrolyzer, put Empty Cells in the bottom-left slot (top-left in Industrial Centrifuge). The following simple items can make Silicon Cells, (as well as other byproducts) which you need: In an Industrial Centrifuge: 10 Redstone (makes 1 Silicon Cell); In an Industrial Electrolyzer: 16 Sand (1), 8 Clay Dust (2), 4 Obsidian Dust (1), 29 Lazurite Dust (3), 23 Sodalite Dust (3), 8 Flint Dust (1), and 29 Emerald Dust (6).
- Now for a harder part: Making an Industrial Blast Furnace setup. If you're playing on Beta A, you can skip this. (Hooray!) You're going to need to make 34 Standard Machine Casings (or a more advanced casing) and an actual Industrial Blast Furnace. This will take quite a bit of Iron and some Nickel as well, which is an ore added by GregTech. The Industrial Blast Furnace page will tell you more about this, but I suggest powering it with a few Generators running simultaneously, until you get your Solar Panels from it.
- You need two Silicon Cells in your IBF, and they should make Silicon Plates each.
Now you should be ready to craft your Solar Panels!
Where and How
You can have your Solar Panels in lines or arrays, but a typical arrangement which is efficient and pretty, is in a flower, like the one shown in the picture. Of course, it can be expanded to have many layers. Remember, Solar Panels can not have a Solid Block above them! Glass is fine, but Cobblestone, even 256 blocks above it, will block the Solar Panel's vision of the Sun.
Down in the Mine
We haven't really talked about all the ores, have we? They can be a tad overwhelming at times.
Vanilla Ores
All the Vanilla Ores can be really useful to you, even Lapis Lazuli. Try to grab lots of them!
IC2 Ores
Again, these ores are very useful. We haven't come across uses for Uranium yet in this tutorial, but it'll be essential for Nuclear Reactors you might happen to build in the future, a very high EU-producing source of energy, but without the right setup could really mess up. Copper is used for making cables and is in many recipes (e.g. Electronic Circuit), and same with Tin (e.g. RE-Battery).
Useful Overworld Ores from Other Mods
Ferrous Ore can be used to make Nickel Dust and Invar Dust, which can be used in various GregTech and Thermal Expansion items. Monazit Ore is used for items relating to Forcefields. Galena Ore can be broken down into other useful items such as Silver, Lead and Sulfur Dust. Infused Stone is used in magic; see here. Xychorium is used in making Machines and Items from XyCraft. Same with Nikolite, but for RedPower 2. Apatite is used in making farms.
Mining Drill!
The Mining Drill is a useful tool for mining, and instead of taking damage uses EU. It does not store that much, but the Mining Drill is like an Iron Pickaxe and an Iron Shovel combined, but again it uses EU.
Crafting Recipes
I'm sorry, but this is one of those things that has to be changed by GregTech again! However, both recipes are similar. If you've created an Electric Wrench in GregTech already, you should be fine with this.
|
Without GregTech Ingredients:
Produces: 1 x Mining Drill |
[Expand]
|
|
With GregTech Ingredients:
Produces: 1 x Mining Drill |
[Expand]
|
Now you simply put your Mining Drill in your BatBox/Generator (while it's powered), and it should charge up! This Mining Drill can break 200 blocks before needing to be recharged.
Sorry, folks, but that's all I have time for at the moment, but I'll definitely be adding more on this tutorial fairly soon!

 Discussion

