ON THIS WIKI
Tutorial:Automated Centrifuge (Forestry)

|
This article is part of the Feed The Beast Wiki's Tutorials section. |
| [Expand]Materials List |
|---|
Any Pipe |
Any Power |
Any Cable | |||||
Different Power Source?
This tutorial shows how to set up using IndustrialCraft2 EU, but it can be easily adapted to other types of power. If the main power available is not EU, use a type of Engine that is compatible with the energy supply. If using an intermittent source such as Advanced Solar Panels, it may be helpful to add an extra buffer for energy storage with a MFE or MFSU.
Pipe Selection
The Apiarist's Pipe connecting the two Hoppers is optional, however it does increase the number of different Combs the system can handle without jamming up, by always attempting to put combs into the first hopper before the second. For systems with fewer than five types of incoming Combs, it is not necessary.
Golden Transport Pipes have been used for their speed boosting effect, but ordinary Cobblestone or Stone will serve just as well.
The Build
A Word to the Wise
The colors mentioned here for Diamond Sorting Pipes may not match the settings necessary when this build is created in other worlds, depending on initial orientation. Use the images as a guide, and let common sense prevail.
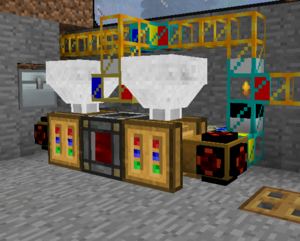
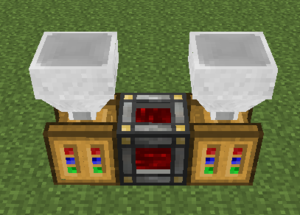
| A space five blocks wide, two blocks deep, and six blocks tall is needed. Three blocks will be below ground level, three at the surface and higher. Begin by placing the Energy Cell in the middle of the chosen space, one Centrifuge on each side, and one Hopper on top of each Centrifuge. The piping will run behind the machinery, so ensure there is at least one block of space to the rear. |
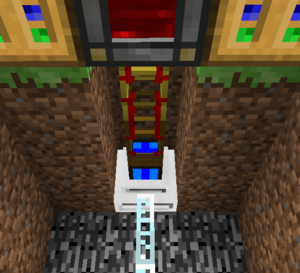
| Dig out a space below the Redstone Energy Cell. Connect a Golden Conductive Pipe directly below it, then a Wooden Conductive Pipe. Attach the Engine to the Wooden Conductive Pipe, which is necessary to draw out the power. Wire the Engine to the power supply.
|
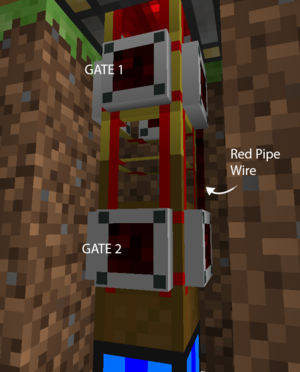
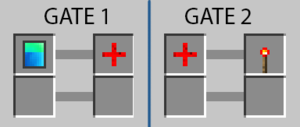
| Put one Iron OR Gate on each conductive pipe. Iron OR Gates or higher tier are needed because normal Autarchic Gates cannot read Red Pipe Wire signals. Put one piece of Red Pipe Wire on each Conductive Pipe to connect them.
|
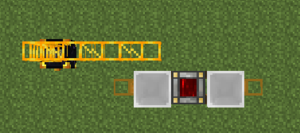
| Bring the incoming supply pipe that collects the items from your Apiaries or Alvearies in on the left, one block back from the Centrifuges, at the same elevation as the hoppers. Attach one Wooden Transport Pipe to the free side of each Centrifuge. |
| Put the Autarchic Gates on the two Wooden pipes attached to the Centrifuges. Configure them both to Items in Inventory / Energy Pulser. This will pull items out of the Centrifuges as soon as they are processed. If extracting incoming items from a chest, use the third wooden transport pipe and autarchic gate with the same settings. |
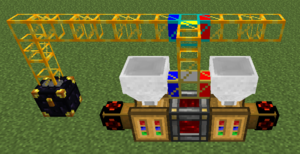
| Use the Apiarist's Pipe to connect the two hoppers, add a pipe on top, and connect it to the incoming pipe with a diamond sorting pipe. Add any items that should bypass the system and go directly to storage to the red line of the Diamond Pipe's filter. Block the blue line with an item that won't ever show up in the system, such as a tool. |
| Royal Jelly, Pollen, Glowstone, Sugar and Ash are all set to bypass the Centrifuges in this example; they will continue straight along the top pipe. The blue port has been blocked. For the Apiarist's Pipe, set one side to "Any Items" and the other to "Anything". This will cause the pipe to attempt to put all combs into one hopper only (The "Any Items" side) unless it is full, in which case it will put the items into the other one. |
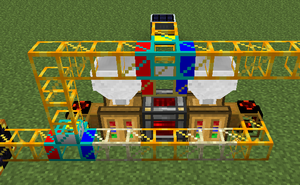
Connect the two outbound Wooden Transport Pipes with a line around the back. Use the two Sandstone Pipes to keep the pipe from connecting into the Centrifuges. The bottom Diamond Pipe is serving as a one-way gate, only allowing items to go to go up (to white) or to the outbound pipe (red). It sends items that need another round of processing such as Silky Propolis and Propolis (if Sticky Resin is desired) back through the vertical pipe and to the Centrifuges again.
ImportantIf Silky Propolis and/or normal Propolis are being collected, do not add them to the bottom diamond pipe's filter. If no items are being processed a second time, block off the white filter. |






 Discussion

