ON THIS WIKI
Exploring Eldritch Dimension
Eldritch Dimension aka The Outer Lands is an endgame dungeon-type dimension added by the Thaumcraft 4 mod. It is completely empty by default, and for each Eldritch Portal the player opens a new maze-like dungeon generates in this dimension. The dungeons for each Eldritch Portal are independent and therefore cannot be accessed from one place. Flying is disabled in the Outer Lands.
This article provides general information about the blocks, structures and mobs described here. For more information, click on the blue name of the wanted page and read the detailed article about this particular mob or block.
General Information[edit]
Contents[edit]
The maze-like dungeon, generated as the player opens the Eldritch Portal (maze further in the article) mainly consists of the following blocks:
-
 Ancient Stone - everywhere.
 -
 Ancient Stone Stairs - everywhere, rounding the corners.
 -
 Glowing Crusted Stone - everywhere, provides light for the maze.
 -
 Glyphed Stone - almost everywhere, most common in a special room.
 -
 Strange Crystals - almost everywhere, most common in a special room.
 -
 Portal to Nothing - everywhere, surrounding all structures of the maze. Meant to prevent the players from escaping the maze.
 -
 Bedrock - everywhere, surrounding all the structures after the Portal to Nothing. Meant to give additional protection from surpassing the maze f.e. in a Boat.
 -
 Ancient Stone Slab - common, generates as a decorative block in several rooms.
 -
 Ancient Rock - common, generates in boss room and in small amount in one other room in the maze.
 -
 Crusted Stone - common, generates in several rooms in big amount.
 -
 Old Urn - uncommon, generates occasionally in the corridors and in some rooms.
 -
 Abandoned Crate - uncommon, generates in some rooms.
 -
 Ancient Stone Pedestal - uncommon, generates under Old Urns in corridors and in boss room.
 -
 Cobweb - rare, generates in one place in all maze.
 -
 Monster Spawner - rare, generates once per maze.
 -
 Ancient Doorway - rare, generates once per maze.
Mobs that spawn here:
- Eldritch Guardian
- Shambling Husk
- Mind Spider
- Eldritch Crab
- 1 of 4 Bosses.
Layout[edit]
The maze mostly consists of countless corridors, which lead to rooms or to dead end. Corridors have 5x5 empty space for the player to walk, rounded from 4 corners with Ancient Stone Stairs. This is packed in Portal to Nothing and then in Bedrock. Same applies to the shell of all other rooms in the maze, so further only the information about the internal content of each room is given.

Rooms[edit]
Portal Room[edit]
This room generates at the entrance of the maze. It contains one Eldritch Portal which the player can use to return to home dimension.

Crossings[edit]
Crossings generate where several corridors come to one place. They do not contain anything but have a larger space.

Ancient Library[edit]
This room contains of several pillars with Glyphed Stones capped by Ancient Stone Slabs. Glyphed Stones are the most common here.

Runed Corridor[edit]
This is a corridor with lots of runed stones (Ancient Stone which zaps the player with a small lightning bolt when the player passes nearby). This corridor is especially dangerous to fight in, as the bolts partly ignore the armor. The bolts also add a temporary Warp to the player, so experienced thaumaturges use this part to greatly speed up the progression through the Eldritch Tab in the Thaumonomicon.

Crusted Nest[edit]
This room contains of lots of Crusted Stone with Crusted Openings, which continuously spawn Eldritch Crabs before destroyed. These rooms are full of Strange Crystals and contain several Old Urns and Abandoned Crates. However, because of the large number of hostile mobs constantly spawning here, this room is not recommended for an inexperienced player, as they can die here quickly.

Crusted Blockade[edit]
This is a part of the corridor that is blocked with Crusted Stone. There are no Crusted Openings in this part, but the corridor bends 90 degrees either left or right, depending on which side you came from. Inexperienced players sometimes fall in Portal to Nothing and die while cleaning this blockade. This is the only 100% safe way to obtain Crusted Stone.

Mind Spider Nest[edit]
This is a part of the corridor which has lots of Cobweb and a Monster Spawner which spawns Mind Spiders. The spawner is somehow unique and is better to be transported to the base to grind these mobs.

Tainted Corridor[edit]
This is a corridor with lots of Fibrous Taint and some tainted plants in it. This part will eventually spread to all maze, but this will take hundreds of hours of loading the chunks and usually never happens.

Capstone Room[edit]
This is a key room for the maze. It contains a capstone with Runed Tablet on it. This room has also some rare Ancient Rock blocks. The room is guarded by 4 Eldritch Guardians. The Runed Tablet is actually a drop, and when playing on a server with the plugin which removes drops, can be removed by the plugin leaving the maze without a single key to open the boss room.

Near Boss Room[edit]
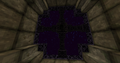
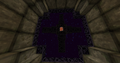
The boss room is separated from the other part of the maze by Ancient Doorway. it can be opened by inserting Runed Tablet in it. This prepares the boss room by placing the objects inside and spawning the boss. Look the images below for the stages of opening the doorway.
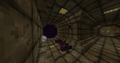
View on Doorway
Ancient Doorway closed
Ancient Doorway after inserting the key
Ancient Doorway opened


Boss Room[edit]
Boss room contains different objects depending on the type of boss spawned in it.
Champion Eldritch Guardian[edit]

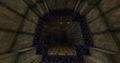
This room will spawn very dark, for the better look of glowing red eyes of the Champion. It will consist of 1 small pedestal the Champion spawns on, 2 Eldritch Portals with 4 Old Urns around each, and also 4 Runed Ancient Stones which are meant to charge the Champion while on 2nd stage.
Crimson Portal[edit]

The portal will spawn in a very bright room with many Glyphed Stones on a small part covered with the blocks from Ancient Doorway. The portal spawns directly in the middle, and places the banners and crates symmetrically.
Giant Taintacles[edit]

The boss room for Giant Taintacles will also be very dark and fully covered in Fibrous Taint and other tainted blocks, making the movement very hard. At first only 2 of 4 taintacles will be giant, but then the 2 other will grow. The taintacles on the screen had both Spined ability, so if the screenshot was taken in Survival, this would make the battle extremely hard, as the player could not use even ranged weapons against them.
If Thermal Expansion is installed, Basalzes will also spawn in this room, making the battle even harder.
Eldritch Construct[edit]

This room is dimly lit, but still better than the tainted one. It has lots of Old Urns and Abandoned Crates as well as 3 Eldritch Portals which assist the boss in battle.
Exploration Tactics[edit]
As the dungeon is maze-like, the time consumed on completing it can scale from 2-3 minutes to 5 hours or more. Below is a guide on how to explore the maze in the least time possible.
- Equip lots of food with good saturation bonus.
- Equip 3-4 stacks of any full block not found in this dimension (see list above).
- Ask a question: "What is the target of exploration?" Boss? Loot? Rare building blocks? Experience? Making this a place to live in?
If Boss:[edit]
- Use any speed potions, flasks or items.
- Run through the corridors, turning always right on the crossings.
- If a dead end is met, run back to the nearest crossing.
- Place a block in the corridor which leads to dead end near the crossing. Now ignore the "blocked" corridor and follow the same tactic for the other corridors for this crossing.
- If all corridors from one crossing are "blocked", run back to the next crossing, and "block" the corridor leading to the "blocked" crossing.
- If boss room found before the capstone room, place 2 blocks (one above the other or next to ect.) on that corridor near first crossing, and, when travelling back, "double-block" all corridors to that room.
- If capstone room found, rush to it, grab the Runed Tablet and run back.
- For the boss room, immediately place a Runed Tablet in the doorway and block it with full blocks, leaving an opening to see the boss from it. Then unblock the doorway if the boss is better to be defeated in melee attacks.
This allows to complete the dungeon in less than 5 minutes.
If Loot:[edit]
- Equip backpacks, bags etc., probably Ender Chest.
- Follow the tactics above.
- When met with a dead end, clean all the loot from it and move to the nearest crossing, and then block the looted part.
- Doing so, the player will not loose any of the loot in the dungeon.
This allows to gather 100% of the loot in about 4-6 hours. The dungeon does have a lot of loot.
If Rare Blocks:[edit]
- Equip storage blocks, even setting up a rail system with Minecart with Chests can help.
- Follow the same tactics, but fully remove all removable blocks from the dead end to the crossing.
- Equip any kind of magnet for better results.
The dungeon consists of ~50 000 blocks which can be mined. This is usually more than enough for the most demanding builder.
If Experience:[edit]
- Find the Crusted Nest
- Remove all the blocks on the floor except crusted openings.
- Remove all the Ancient Stone Stairs in the corridors nearby.
- Use Fans, Corporeal Attractors, Conveyor Belts or other ways of moving the mobs out of the room and moving them 1 block up.
- Now make them fall in the grinder part, which may consist of anything which can damage the mobs.
- Stand nearby to collect tons of experience from the mobs.
The Crusted Nest gives about 1 crab per second, this is roughly 4-5 times better than a Blaze spawner XP grinder.

If place to live in:[edit]
- Defeat the boss (using any tactics wanted, probably the one in first list)
- Clean all the corridors leading to the boss room from the portal room.
- Place doors and other decoration stuff in the crossings.
- Now the part of the dungeon is ready to be the base. This part can be very nicely decorated and is generally very cozy. The big space in boss room allows to set the main base there, while corridors and smaller rooms can fit for other needs.
- New parts can be claimed if necessary.
- Signs can be used for easier navigation.

 Discussion

